The fully finished public release of FoCal 3.5 is now available to all users, bringing extra features and lots of improvements and fixes.

This latest release changes how Calibration Check works, quickly check autofocus calibration with mirrorless and DSLR cameras completely hands free. There’s also huge speed improvements when using the FoCal Wireless Camera Control Module, general improvements to camera control across all cameras, lots of usability improvements and a whole host of bug fixes.
What’s New?
[If you’re not interested in the details and just want to grab the release download info is here]
Headline Features
- Brand New Calibration Check
- Big Improvements to the Wireless Camera Module support
- Important macOS bug fix
- Usability enhancements and fixes
- Camera control improvements
For a recap of the operation, you can check out the FoCal overview video.
The Release Notes contain a comprehensive list of changes.
Brand New Calibration Check
The Calibration Check function in FoCal offers a quick, hands-free way of checking autofocus performance and lets you know if the current focus calibration is working well.
With FoCal 3.5, we’ve changed how Calibration Check works, now supporting mirrorless cameras and allowing more accurate results.
Calibration Check Overview
The first version of Calibration Check made use of Live View image capture and compared against Viewfinder (i.e. non Live View or phase detect) capture. Here’s an example showing the Live View capture in blue, and the (not well calibrated!) Viewfinder capture in red:

There are a couple of issues with this approach.
- It assumes Live View autofocus is the best possible focus.
- What if you don’t have Viewfinder autofocus – i.e. mirrorless cameras?
Is Live View autofocus perfect?
Live View autofocus uses the image sensor to capture data for autofocus. By comparison, DSLR viewfinder autofocus uses a separate sensor, usually in the bottom of the camera, and the results from this separate sensor are susceptible to errors (see here for more info).
But that doesn’t mean Live View autofocus always gets the best image possible. There are compromises in the camera’s Live View implementation- mostly to increase speed and allow headline-grabbing features like autofocus at 30 shots per second – these compromises affect the overall quality and consistency of focus.
Take a look at the example below, captured during the development of our new Calibration Check tool. It shows the quality of a number of points measured using a Canon EOS 6D. The purple line is the best achievable quality, the green line is the phase-detect autofocus quality, at the bottom, with the lowest quality values is the live view quality in orange:

The Live View result is usually pretty close to the best possible quality, but it’s not always right up there at the top.
To add to complexity, the Nikon D780 allows AF Fine-tune adjustments for both the Viewfinder and Live View autofocus separately, a clear indication by Nikon that Live View autofocus may not always give you precisely the focus point you want.
Mirrorless Cameras
Mirrorless cameras only have Live View autofocus, up until FoCal 3.5 you couldn’t use Calibration Check at all with these cameras. With only 1 autofocus system, there’s nothing to compare.
So… we’ve created a new autofocus system – FoCal AF!
FoCal Autofocus
FoCal AF has existed in one shape or another for more than 5 years within FoCal, but it’s been a huge challenge to get it close enough to perfect where we can rely on it for Calibration Check.
Whereas a camera manufacturer has complete control of the camera hardware and can make precise adjustments to lens focus position, FoCal has access to the control interface provided by each manufacturer, this is a different level of control and these inputs can sometimes be coarse and imprecise.
There’s also a huge variation in how lenses behave when the focus position is moved – new and higher quality lenses tend to behave quite well, but lower quality or very old lenses can exhibit varying degrees of stubbornness to respond to commands and tend to move very randomly!
But over those 5 years we’ve learnt a lot, and tuned and refined the workings of the algorithm so that it now gives us that reference – that “best quality” image – we’re after to allow us to check the performance of the native, internal autofocus system of the camera.
Here’s an example of the results on the Nikon Z7 with a well-calibrated, good quality Nikkor 24-70 f/4 S lens. The red line shows the quality achieved by the Z7 standard autofocus, and the blue line shows the value obtained using FoCal AF – always at least the same as the Z7, usually a fraction better. (Note this chart is only showing a small fraction of the whole Quality of Focus scale – the values are very, very similar, but FoCal AF is fractionally better).

Are there limitations?
FoCal AF uses real-time analysis of Live View data from the camera. There was a bit of a step-change in Live View quality around the start of 2013, so older cameras tend to behave poorly as the live view images are not detailed enough or are over-sharpened.
By default, Calibration Check will use the original Viewfinder vs Live View method of operation for all DSLR cameras, and the FoCal AF method for mirrorless cameras (if you want to try out the FoCal AF method with your DSLR and you’re using FoCal Pro, head to the Settings and change Peak Search Interval to Auto).
Other Changes to Calibration Check
In operation, the new version of Calibration Check is no different to use – in fact, it’s easier than before as we’ve improved control of the cameras to automatically setup more camera features, reducing (or removing in most cases) any initial setup checks you previously had to do manually.
So connect your camera to FoCal, fire up Calibration Check and hit Start to get going.
There are a few things that it’s worth being aware of with the new Calibration Check
Settings
In the Calibration Check Settings page there’s a new setting: Peak Search Interval. This determines whether FoCal AF is used or not, and it’s automatically set based on the camera you connect.

For mirrorless cameras, this will be set to Auto (this means FoCal will automatically determine when to use FoCal AF), and for DSLR cameras this will be set to None (this means FoCal AF won’t be used by default, but you can change it here).
Results Scaling
The scaling of the results has changed to make the difference between good and bad performance far more obvious. Previously, a well-calibrated lens would have a value very, very close to 1.0 (e.g. 0.99), and by the time it dropped to 0.9 the performance was starting to get very poor.
We’ve expanded this now and give the Autofocus System a Performance measurement between 0 and 100. A value above 90 shows a well calibrated lens, and a value above 60 shows an acceptably calibrated lens (one that you should investigate further by running a Autofocus Calibration). Below 60, and your lens definitely needs tuning.

We’ve also changed the naming of a few values in the Summary screen – we now use the term Autofocus System Performance instead of Calibration State.

Unnecessary information has been removed from the Details results panel (FoCal Pro only feature). The primary purpose of Calibration Check is to check focus calibration, not to provide detailed analysis, and having too much information made it harder to see the results you actually want (you can still see things like Astigmatism Factor, colour ratios etc in all other tests, so running an AF Consistency test in FoCal Pro will let you dig into those details for instance).

Live View Images
When running in the new FoCal AF mode, Calibration Check analyses Live view images rather than shots. These are generally a little lower quality – not a problem for determining quality differences to give a result about the autofocus performance, but the actual Quality of Focus value will be different to those obtained with a shot taken by the camera.

For this reason, we’ve added an “(LV)” to the Quality of Focus values in the Shot List table to make it clear that analysis is performed on Live View images. In places, there is also a Source column which will be either “Shot” or “Live View” as appropriate.
We’ve also removed the FoCal Comparison Data bands from Calibration Check in the new mode until we collect enough Live view performance data.
Some Results
Let’s take a look at some results from FoCal 3.5 Calibration Check.
Here’s Calibration Check run on a mirrorless Nikon Z7 using the FTZ adapter to attach an F-mount Nikkor 70-200 f/2.8 lens:
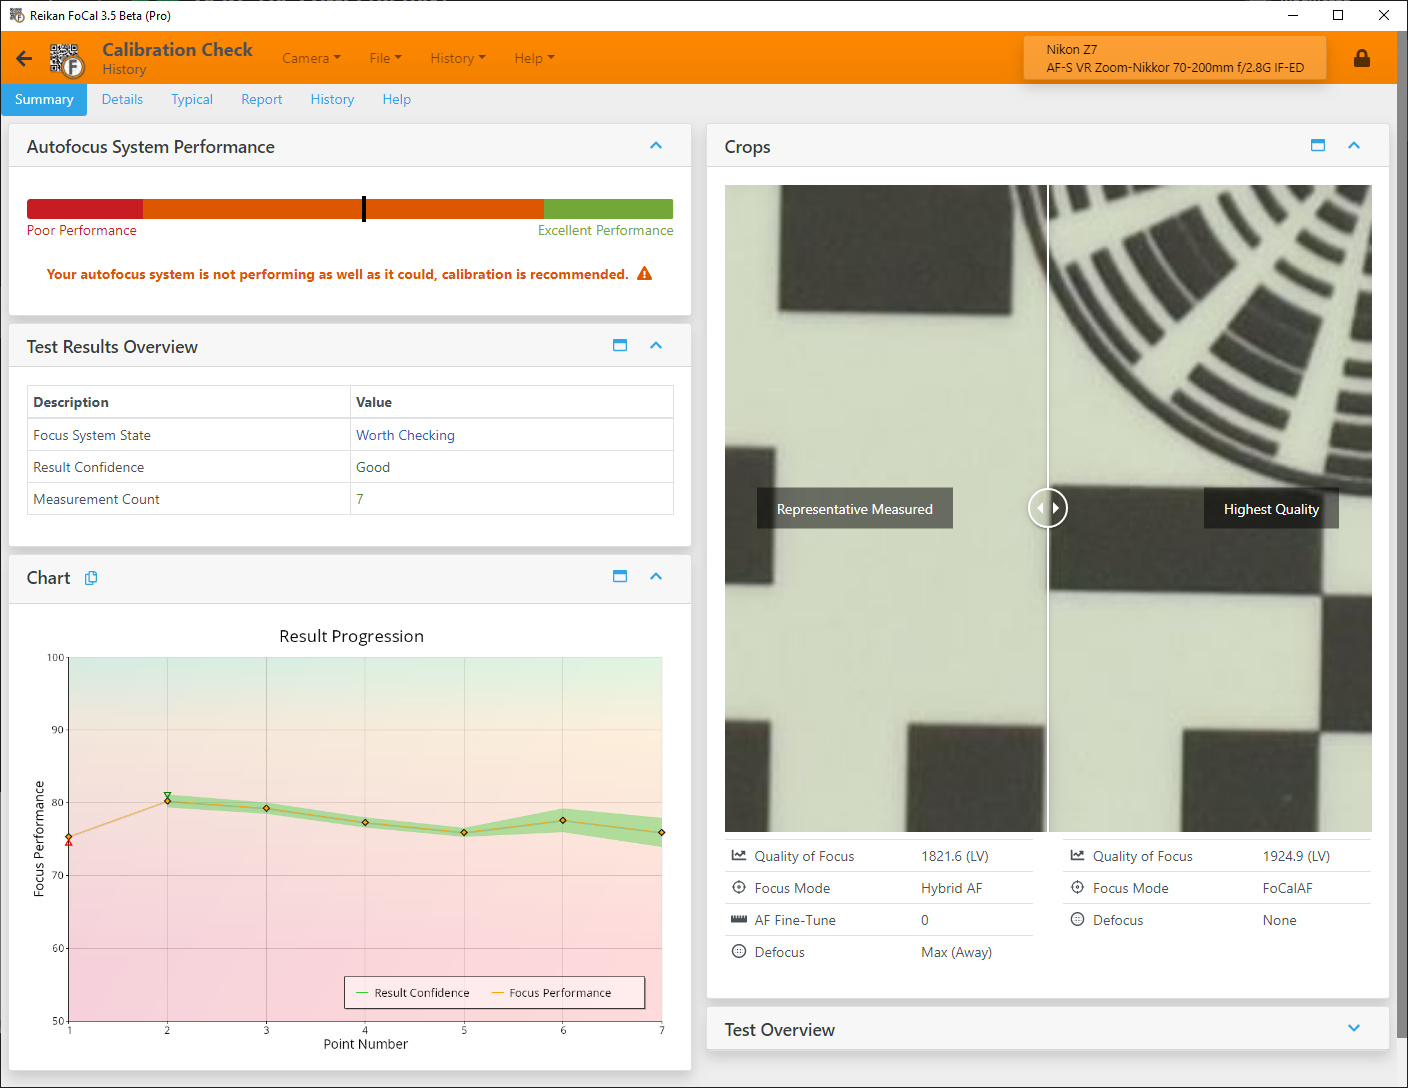
In the Autofocus System Performance, the black marker is in the orange area, and the details show a performance value of 75.9. As such FoCal is recommending checking the calibration.
After calibration, which recommended an AF Fine-tune value of -2, the results look like this:
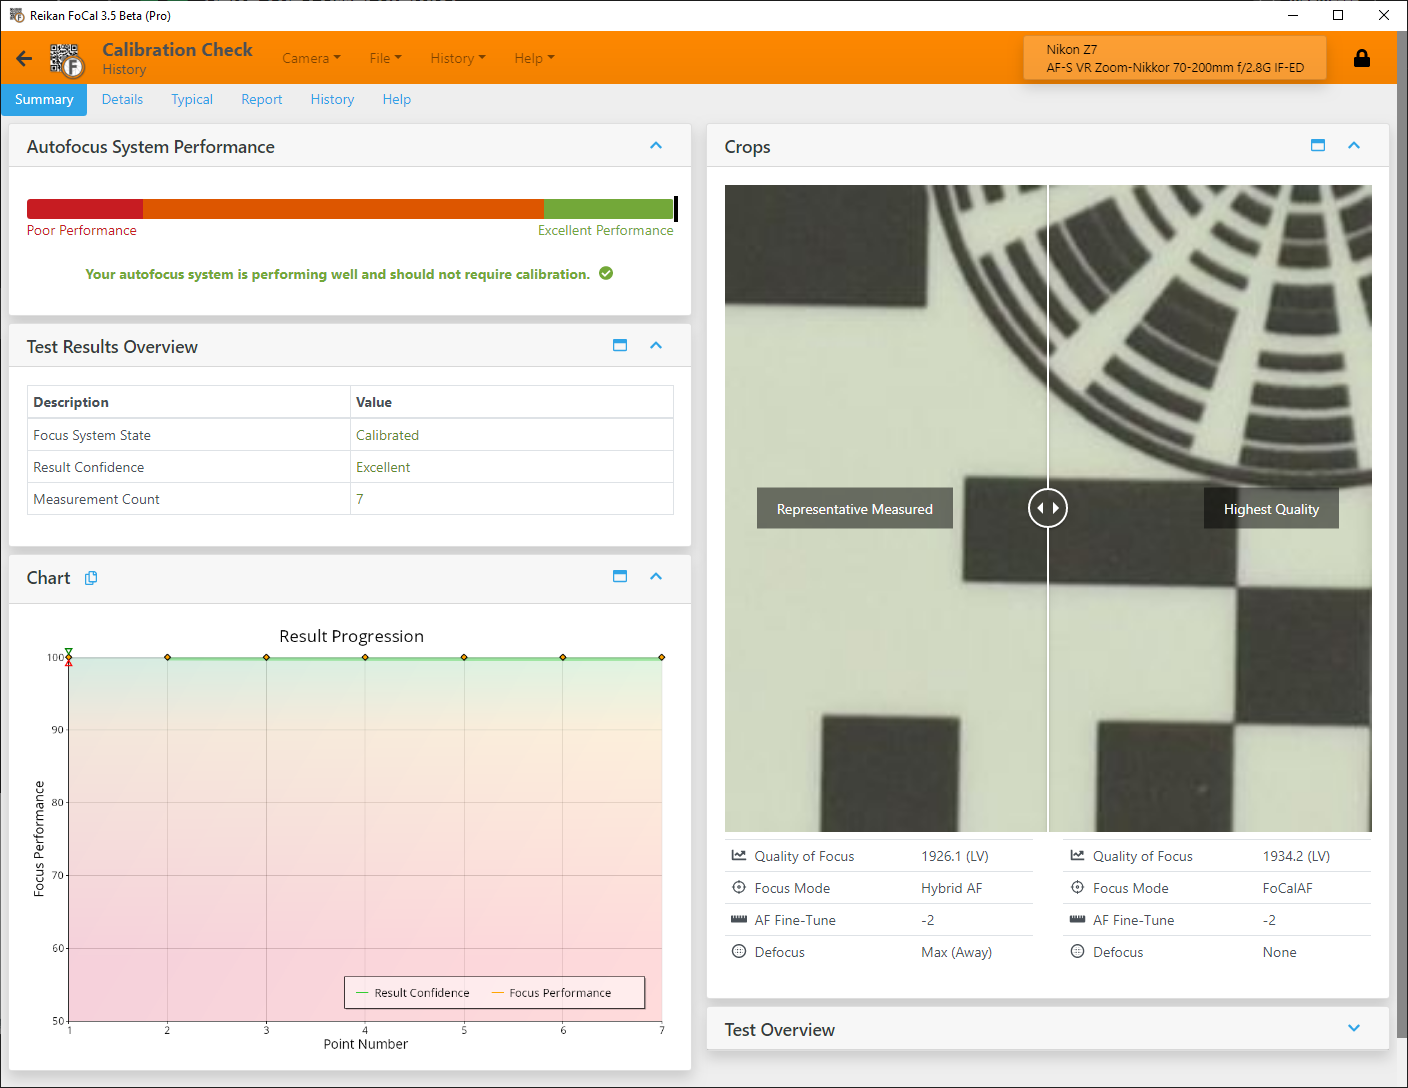
In these results, most of the measured values using the camera autofocus are matching the peak quality detected by FoCal AF, giving an autofocus performance of 100 and showing the focus is performing very well.
Big Improvements to Wireless Camera Module
6x Faster Speed Boost!
We first revealed the Wireless Camera Control Module back in December, and launched a beta programme a little later to get feedback from users.
While the module itself works well with positive feedback, several testers reported it being a little… slow. It does offer the very useful ability to control a camera at a distance without the USB cable, but the price paid is that a typical calibration on a high-megapixel camera like the Nikon Z7 could take close to 20 minutes.
With updates to both FoCal and the Wireless Camera Module firmware, we’ve managed to increase the transfer speed between the module and the camera by 6 times!
The result is that tests run over wireless are now much, much quicker, as shown in the table below:
| Test | Original Module Firmware | New Module Firmware | USB |
|---|---|---|---|
| Calibration Check | 11m15s | 3m20s | 1m39s |
| Autofocus Calibration | 19 minutes | 5m55s | 3m10s |
| AF Consistency | 5m45s | 1m52s | 59s |
| Aperture Sharpness | 7m36s | 2m27s | 1m10s |
| Multitest | > 1 hour | 14m44s | 8m41s |
Over-the-Air Updating
For the first release of the Wireless Camera Module, the firmware was embedded within FoCal so you would only get updates when there was a new release of FoCal. With FoCal 3.5, new firmware is automatically obtained from FoCal servers and the Wireless Module is updated automatically on connection, you’ll get the updates as soon as they’re available.
[Note: for the first update from the currently release firmware (1.0.6) you must use the restore functionality described below.]
Redesigned User Interface
The Wireless Module now has its own page, accessible under Help > Wireless Module.

With no unit connected, you’ll just see the Activation and Restore Unit options. Enter the module key and connect to see more tabs:

The Statistics tab shows lots of information about how the unit is running – the module CPU usage, memory use and various statistics about the transfer speed over both wireless and USB:

The Settings tab offers configuration options and utilities for the module.

The top of the Settings tab offers the ability to set the country for your module – you should check this is correct when you first connect.
Country Mismatch Alert
Wi-Fi transmission is regulated by national bodies, with different countries allowing transmission in various bands across the wireless spectrum. To get the best from the Wireless Camera Module, it’s important to set the country correctly, FoCal will now warn you if there’s a mismatch between the country set within the Wireless Camera Module and the current country you’re in (based on your computer system settings).
When the Wireless Camera Module is reset and restored, it defaults country to the United States. In the 2.4GHz band on which the module operates, this is the most restricted country, so there’s no risk of being non-compliant with local laws. However, you may be reducing the performance of the wireless communications if you don’t have the correct country set as the module may not be using all of the available wireless spectrum.

Restore Functionality
If there are problems with the module, it can be completely reset, but at that point it will not work until the firmware has been restored which, up until now, has required a separate application from Reikan.
With FoCal 3.5, the functionality to automatically restore a reset module is now integrated.

Note: if you currently have a FoCal Wireless Camera Module, you MUST use the restore function to update the firmware due to a bug in the existing firmware (v 1.0.6). Full instructions are given within FoCal if you head to Help > Wireless Module.
Improved handling of missing internet connection
If you use the Wireless Module on a laptop, you’re likely to be disconnected from the internet as the WiFi connection will be to the Wireless Module, and not your router. This has made it complicated to add cameras to your license, but FoCal 3.5 simplifies this procedure.
First of all, if FoCal cannot communicate with the License Server, a small red icon is shown on the top right of the window:

If you connect to a new camera in this state, you’ll see a warning message:

As the message says, the details for the camera have been stored, so now if you reconnect to the internet you’ll automatically see a message at the top of the window to guide you through licensing:

Hit the Click here to go to license page… and there’s a very obvious panel in the middle of the page showing the camera information. Click the Add to License button and you’re all sorted.

At this point, just reconnect to the module and you’ll be able to use the camera.
A note about updating the Wireless Module
The Wireless Module firmware has been moving forward rapidly, and this has meant that the communications protocol between FoCal and the module has changed. This means that the integrated Firmware Update process within FoCal will not work to update the module from previous versions.
In order to update, you will need to Reset & Restore. From the Help > Wireless Module page, choose Restore and follow the instructions on the page (see above for more info).
Wireless Module Availability
To date, the Wireless Module has been in the hands of our beta testers, but we’re preparing a batch with the latest firmware and speed improvements, available on the FoCal Store very soon. A limited number will be made available at a reduced price as we move towards the final development phase – there’s further speed improvements and more functionality in the pipeline, coming soon!

We’ll provide further information via email and social media channels when the modules become available. If you’d like to be kept in the loop click to register your interest in the Wireless Camera Control Module, we’ll also send out information to the general mailing list at a later date.
Important reliability fixes on macOS
We’ve found and fixed an annoying bug that could cause reliability issues on recent releases of macOS (12.3 and onwards).

Apple made an undocumented change in macOS 12.3 which broke the way FoCal displays the user interface – we quickly fixed this in FoCal 3.2 Maintenance Release 1.
But there were some subtle consequences of the change that led to occasional unreliability on macOS since 12.3, manifesting as FoCal appearing to stop updating even though tests and operations are still running.
It’s been tricky to find, but we’ve identified and fixed the issue now so there won’t be any more hangs of the user interface on macOS.
User Interface enhancements and fixes
FoCal 3.5 brings further enhancements to the usability and functionality:
Battery level & Raw indication on camera card
Two icons have been added to the Camera Card, shown on the top bar of FoCal when a camera is opened.
You can now quickly see the state of the camera battery, as well as an indication of whether Raw mode is enabled for tests.

Fixed issue with history windows of same type
There’s been a long-standing issue within FoCal where if you opened several history entries of the same test type (e.g. multiple Calibration Check tests as shown below), then clicking between them would not change to the selected test. This bug has now been fixed.

Chart Scaling Options
You can adjust the scaling of the charts to see more detail in the data by clicking the numbers on the y-axis of the chart.


“Back to Test” button much clearer in Target Setup
From each test, you can jump to Target Setup by clicking links within the explanation text, or using the Target Setup button on the bottom bar.
The button at the bottom of the Target Setup window which returned you to the test you came from was always a bit subtle and we had several queries raised about it’s purpose. It’s been made a lot clearer now:

Test Focal Length added to Test Overview information
The Test Overview panel shows details about the test, but was missing the focal length at which the test was run, so this has been added.

History Table improvements
Previously, a history entry with crop images available to review was shown with green text, and this meant that the colour of the Summary text was always green. We’ve changed the look so that entries with crops available are shown with a blue background, so the colour indicating the status of the result in the Summary column can be seen.

Camera Control Improvements
There are a great deal of improvements and fixes included in this version, more details are available in the changelog on the release notes for this release, but here are some notable improvements and fixes:
Canon Improvements
- Fixed an issue where live view would not start under certain circumstances on the Canon EOS R, RP, R5 and R6 cameras.
- Improved the transfer speed of images
- Fixes to aperture control in Live View
Nikon Improvements
- Fixed an occasional jump in focus position on start of Live View which could potentially affect reliability of some tests.
- Improved reading Live View image data from cameras released in 2018 and later. Live View operation is more stable and there is more information available within FoCal for confirmation of the camera state.
- Fixed an issue which stopped Live View starting on Nikon Z cameras under some conditions
- Fixed an issue where the autofocus point selected in Live View was not correctly set, meaning under some situations a wide or face-detect mode could incorrectly be in operation.
- Fixes to handling Raw+JPEG image modes and 1/2 EV exposure modes
Test Improvements
- More camera settings are checked and automatically set on start of tests, reducing the amount of messages shown to the user and improving usability.
Operating System Support
The following are supported Operating Systems:
Windows (64-bit)
- Windows 11
- Windows 10
- Windows 8.1
- Windows 7 should work, Microsoft ended support in January 2020 and we do only limited testing on Windows 7.
Mac
- macOS Monterey (12.x)
- macOS Big Sur (11.x)
- macOS Catalina (10.15)
- macOS Mojave (10.14)
- macOS High Sierra (10.13)
- macOS Sierra (10.12)
More details…
There are more details in the changelog on the release notes for this release.
Thank you!
Thank you to all our users past and present who’ve used FoCal for their calibrations. An extra special thank you to everyone who’s got in touch with feedback, a lot changes are driven directly from what you tell us!
Get Reikan FoCal 3.5
Download FoCal 3.5 for Windows or macOS by logging in to the account system via lms.fo-cal.co.uk. Once logged in, you will see a download link to the software.
FoCal 3.5 is available to all users that are within their Included Updates Period as of 26th May 2022. You can get the software as below:
- By logging in to the FoCal Account system via lms.fo-cal.co.uk.
- Go to the About > Update Check option in the software. From here you can hit the Download button to get the software.
If you’re outside of the period above you can purchase 12 months of updates by logging in to the account system via lms.fo-cal.co.uk and scroll to Included Updates Period.
If you’re not yet a FoCal user you can purchase the software as a download or boxed product, as well as FoCal Hard Targets from the FoCal Online Store.
Reikan FoCal on Social Media
We regularly post news and updates on social media. You can keep updated, connect and follow us via: